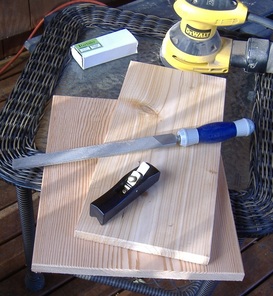
Painting on Western Red Cedar (Thuja plicata) resents its own challenges and advantages. One disadvantage in painting on wood is that the size and composition of the paintings are dependent upon the size of the boards used. Because I buy lumber as opposed to milling my own boards, width is typically a determining factor for my designs. I have access to a limited choice of cedar lumber. The three common widths (in actual dimensions) are 5 ½ inches, 7 ¼ inches, and 11 3/8 inches. On occasion, I am able to get wider boards, sometimes up to 17 ½ inches. By creating specially designed framing or by gluing boards together, I am able to circumvent this inherent limitation and thus expand the possibilities. This allows more freedom in designing. Also, since the length of the boards is typically longer than needed, I can cut the wood to fit my design.
Knots and cracks are typically not a problem for me as I love the natural aspect of the wood. I like the effect they create in conjunction with the grain of the wood---they make the painting come alive. They really are not an issue and add a sense of imperfection to my finished work, which I like. (I hope for passion and spirituality in my art—not perfection). I use an orbital sander to smooth the surface of the wood upon which I plan to paint. I also plane the edges parallel to the grain and use a file to bevel the ends. Once prepared, the wood is ready for the design.
Knots and cracks are typically not a problem for me as I love the natural aspect of the wood. I like the effect they create in conjunction with the grain of the wood---they make the painting come alive. They really are not an issue and add a sense of imperfection to my finished work, which I like. (I hope for passion and spirituality in my art—not perfection). I use an orbital sander to smooth the surface of the wood upon which I plan to paint. I also plane the edges parallel to the grain and use a file to bevel the ends. Once prepared, the wood is ready for the design.
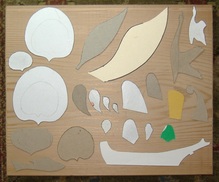
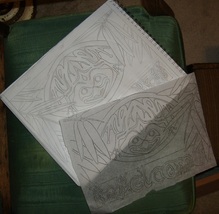
As cedar is a soft wood, I hesitate to draw my design directly on the wood at first. Any changes I would make would mar the wood and affect the overall look. The pencil lines ultimately are a guide only for the act of painting. Thus, I first draw the design on a sketch pad using standard no.2 pencils. If the design is for a small painting, it will fit entirely on the pad. However, larger designs require several sketches which will come together when transferred to the cedar. I draw my designs free-hand but use a ruler when straight lines are desired and a compass for my circles. I also use cardboard templates (like those traditionally used in Northwest Coast Indian art) for leaves, feathers, and other design elements that I desire to be uniform in the composition (I love the repetitive nature of pattern, especially seen in many wallpaper, kimono, and textile designs).(1)
(1) I first learned about making cardboard templates while sitting in on Harry Calkins’s lectures on Northwest Coast Indian Art at the University of Washington in 1976-77. Calkins was teaching the class for Bill Holm that quarter. I also remember seeing traditional cedar bark templates on display at the Royal British Columbia Museum and heard that the great Kwakwaka'wakw carver Willie Seaweed even had stainless steel templates.
 |  |
When the design is complete, I transfer it to the cedar using tracing paper. As this produces a reverse image, I often draw the design in reversed form at the beginning of the process. I first saw tracing paper being used by Tsimshian artist Roy Vickers back in 1976 while he was designing a silk-screen print.(2) I thought it was a brilliant method for transferring a design to maintain bilateral symmetry.(3) I have since used tracings to transfer all of my designs from the drawing pad to the cedar. It means that I end up drawing each design many times before I actually can begin to paint, but I like the freedom it gives me in creating a design pleasing to me. I hope to use my tracings someday to make prints using Andy Warhol’s “Blotted Line” technique.
(2) In May, 1976, I attended the Northwest Coast Studies Conference with a group from the Ozette dig. The conference was held at Simon Fraser University in Burnaby, British Columbia. At that time Roy Vickers was a young artist who was demonstrating his print making and selling his prints at the conference. I had the opportunity to talk to him about his art and watched his stall for him while he took a quick break. I purchased an artist’s proof of his First Horseman of the Apocalypse which has been a source of inspiration for my own designs.
(3) In watching a BBC documentary about illuminated manuscripts, I learned that medieval artisans also used very thin vellum just like tracing paper to achieve symmetry as well.
(3) In watching a BBC documentary about illuminated manuscripts, I learned that medieval artisans also used very thin vellum just like tracing paper to achieve symmetry as well.
 |  |
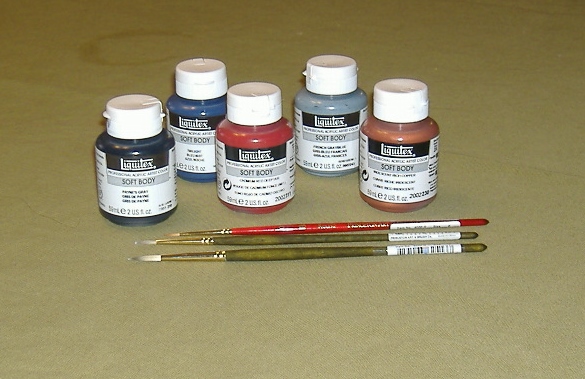
Once the pencil lines are on the cedar, I can begin to paint. I like to use short-handle pointed round brushes and acrylic paint. My most useful and favorite brush is a Princeton Umbria No.4 round. I use these brushes for most of my painting needs. For smaller, detail work and fine lines I switch to Princeton No. 2 and No. 0 round brushes. As for paint, I almost exclusively use Liquitex Soft Body acrylic paints. I find that they are perfect for painting on a cedar surface. Soft body acrylics are thick enough so as not to bleed into the grain of the wood, yet thin and smooth enough to produce a uniform and continuous line. Acrylics have the advantage of drying quickly and give me the flat paint result I desire.
 |  |
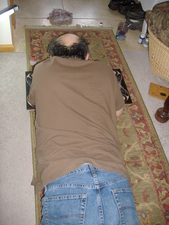
I paint on the floor with my face directly above the wood surface. I rest my forearm on the cedar panel to give stability and to allow for sharp, straight edges to my painted regions. In most cases I use a continuous brush stroke towards my body, pulling the paint along the pencil line to get the edge I want. This allows me greater control to produce a straight line or curve.(4)
(4) The motion of pulling the brush towards myself is the same technique Northwest Coast Indian carvers use in carving cedar. While living in Neah Bay, I had the chance to observe many carvers and even tried my hand at carving cedar myself. I have used this technique of painting for close to forty years—it just seems like the natural way to paint on cedar. This similarity of motion between painting and carving is nicely discussed in The Transforming Image: Painted Arts of Northwest Coast First Nations, ©2000, Bill McLennan and Karen Duffek, page 98.
 | 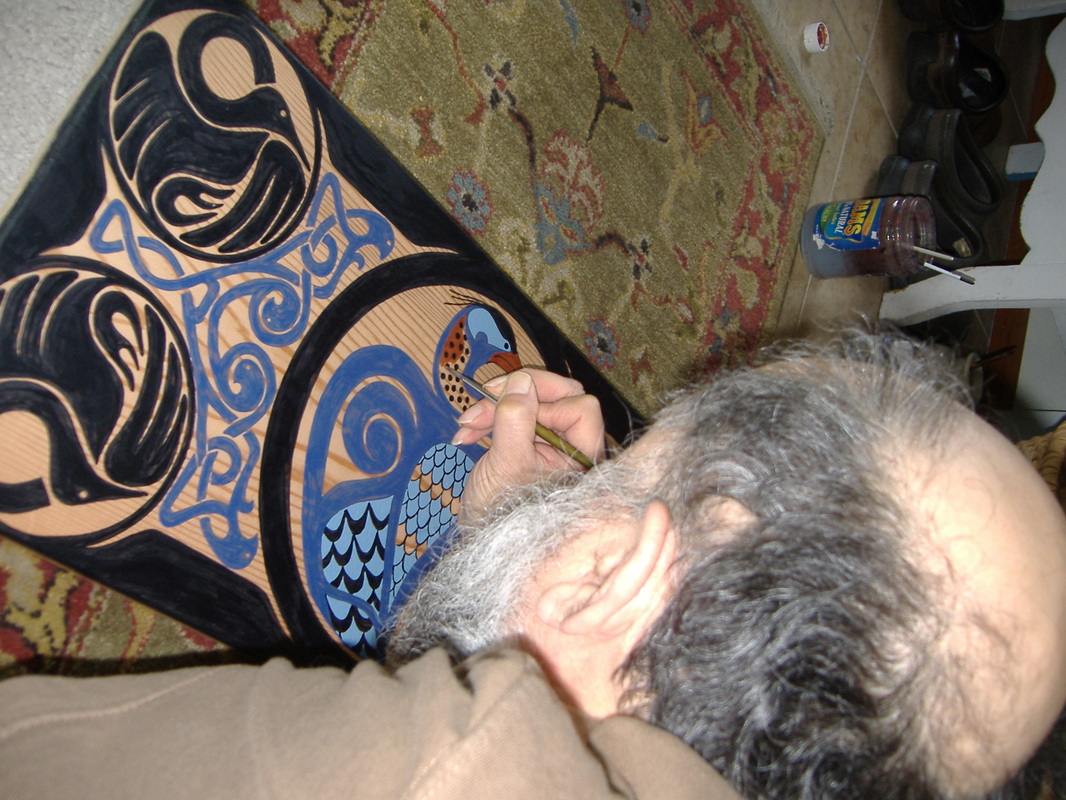 |
I begin by painting one edge of the painted region and fill in much of the area with a particular color. Then I either turn the board or, for larger paintings, reposition myself to paint the remaining edge of the region and filling in any remaining area. Often, to achieve a sharp edge, I use short brushstrokes, and may do several of them over the same line to achieve the sharpness I desire. For curves, I try to use a long, continuous brushstroke (almost calligraphic) to continue a curve over a long line. For circles and spirals I use the tip of the brush to start and end up by using the back of the brush’s base to complete the curve.
I tend to paint my primary formlines first, as is typical for traditional Northwest Coast Indian paintings. They give the structure and foundation for the composition and are the main way in which my painting style is grounded in the tradition.(5) I paint one color at a time, painting in all of those regions that I have decided will be that color. I paint primary regions first, then the secondary areas, and finally all tertiary elements. Fine details I leave for last.
I tend to paint my primary formlines first, as is typical for traditional Northwest Coast Indian paintings. They give the structure and foundation for the composition and are the main way in which my painting style is grounded in the tradition.(5) I paint one color at a time, painting in all of those regions that I have decided will be that color. I paint primary regions first, then the secondary areas, and finally all tertiary elements. Fine details I leave for last.
(5) As a non-native, I do not do Indian art; however, my main source of inspiration comes from the late 19th century painted house fronts and interior dance screens of the northern coast tradition. I always strive to give homage to those amazingly talented and creative Native artists and their paintings are truly masterpieces of world art.
As stated earlier, I use Liquitex acrylic soft body paints to paint on prepared cedar boards.(6) Like the Scottish Colourists who preferred to use “out of the tube” colors with which to paint, I rarely mix my paints. I also purposely choose to use a restricted palette, which is a direct connection to the one-to-three color schemes associated with Northwest Coast Indian art. I like working within the confines of a restrictive system and the creative challenges it presents. Thus, I rely on five main colors for most of my compositions. The main colors I have chosen to use are Payne’s Gray as a primary color, Burgundy (or Cadmium Red Deep Hue) as a secondary color, and Iridescent Rich Copper for tertiary and in-fill regions. Two other colors that I frequently use and are important to me are Twilight Blue and French Gray-Blue. I particularly like the effects of the copper paint, especially when the light catches it just right. My paintings are best seen in changing light, both natural and artificial, and when the light hits the copper in a favorable way, the painting comes to life.
(6) Liquitex Soft Body Acrylics
Major Colors Supplemental Colors
Payne’s Gray (#2002310) Neutral Gray (#2002599)
Burgundy (#2002834) Hooker’s Green (#2002224)
Cadmium Red Deep Hue (#2002311) Permanent Green Light (#2002312)
Iridescent Rich Copper (#2002230) Olive (#2002907)
Twilight (#2002910) Baltic Green (#2002835)
French Gray Blue (#2002243) Sap Green (#2002315)
Chromium Oxide Green (#2002166)
French Ultramarine Blue (#2002382)
Swedish Blue (#2002906)
Cobalt Turquoise (#2002169)
Iridescent Rich Gold (#2002235)
Unbleached Titanium (#2002434)
Wisteria (#2002909)
Brilliant Purple (#2002590)
Light Blue Violet (#2002680)
I hope this description of my painting technique can help you to better understand my art. It helps me as well by giving me the chance to articulate what I strive to achieve in my painting.
 RSS Feed